How to sew on a two-hole button by hand
Attach a flat button to an ordinary shirt. Follow the needle route, use a fine pin to leave room under the button, then fasten off and check the closure.
Check the fabric and button first
This method is for a flat two-hole button on an ordinary shirt made from light or medium-weight woven fabric. Coats, leather, loose knits and buttons with a built-in loop need different instructions. If the attachment point is torn or fraying apart, repair the fabric first.
Try the replacement button in the buttonhole before sewing: it must pass through and hold the closed edges together. Take the shirt off, unbutton it and lay it out. Only the button-side placket should be under your needle.
Gather your tools
You need the button, ordinary sewing thread, a hand-sewing needle, small scissors and a fine straight sewing pin. The needle must fit easily through both holes. The pin is a temporary spacer; use its thin shaft, not its head. A thimble is optional.
Reading the diagram
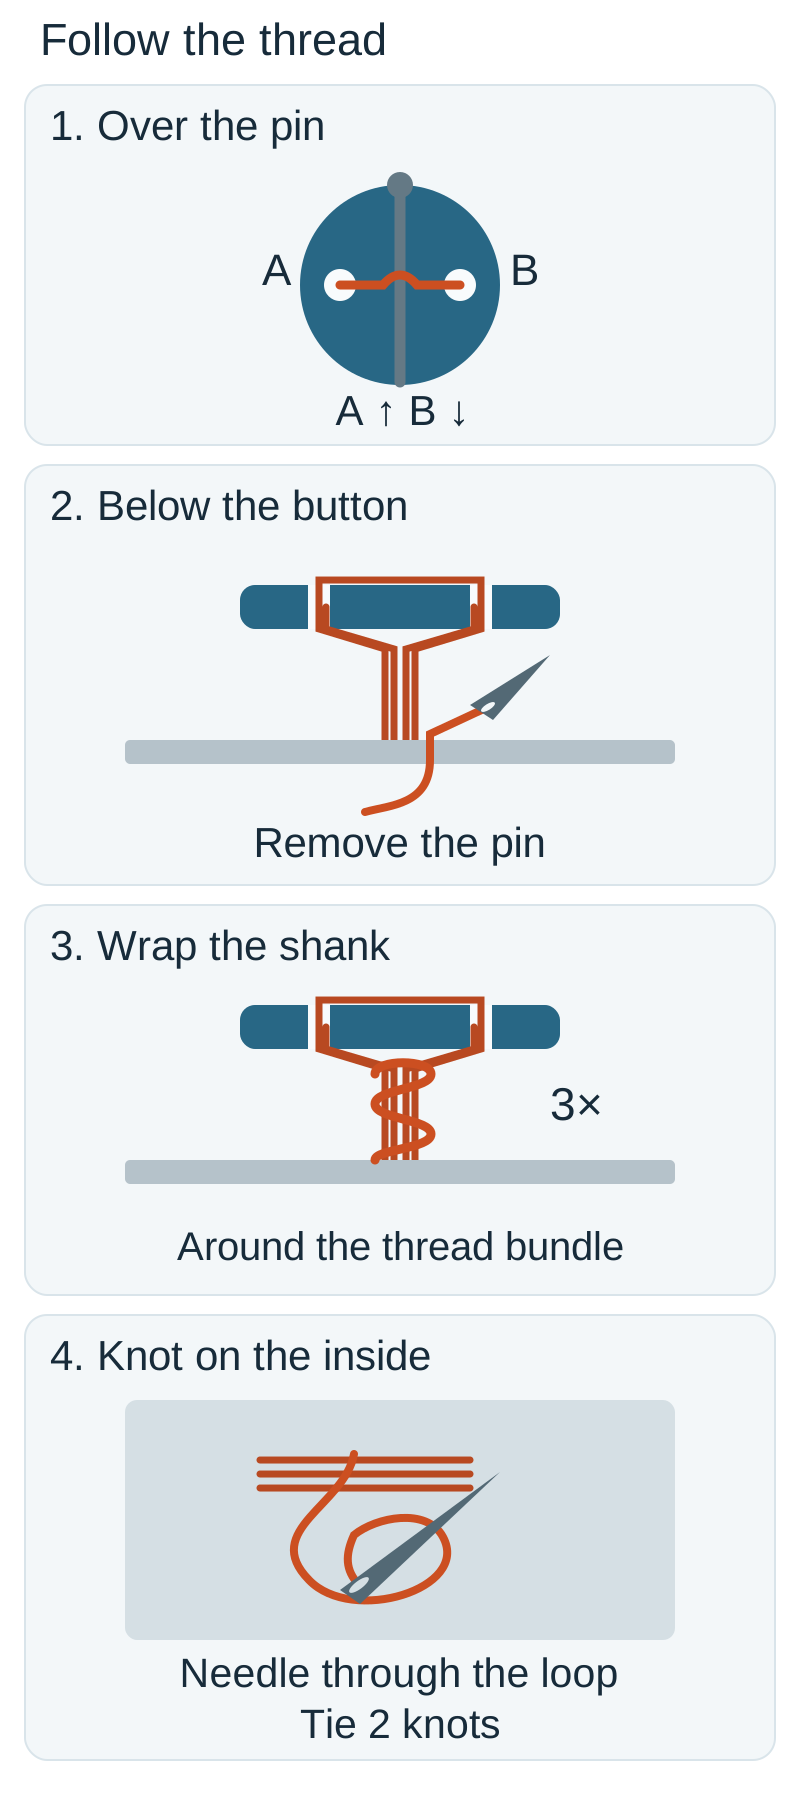
Gaps are enlarged to show the thread route. A and B label the two holes; the grey strip is fabric and the orange line is thread. Wrapping and the finishing knot have separate panels. The number of strands in the bundle is schematic.
1. Find the position and thread the needle
Use the old stitch marks as your guide. Snip away loose thread without catching the fabric. If there are no marks, fasten the neighbouring buttons, align the edges without twisting and mark the position through the empty buttonhole. Then unbutton the shirt again.
Cut about 60 cm of thread, pass it through the needle, bring the ends together and knot them. You now have about 30 cm of doubled working thread.
2. Make the first stitch over a spacer
Bring the needle from the inside through the fabric and hole A. Pull until the knot meets the fabric. Lay the pin across the top of the button, between its holes and across the line the thread will follow. The thread must cross over the pin shaft.
Take the needle over the pin, down through hole B and through the fabric beneath it. That is one complete stitch: up through A, then down through B. Keep the other side of the shirt out of the way.
3. Repeat the route
Make five complete stitches in total, coming up through A and returning through B each time. Pull just enough to remove loose loops; do not press the button into the fabric. Five is a starting point for this guide, not a strength guarantee: thread thickness and fabric condition vary. Save enough thread for wrapping and fastening off.
4. Form a short thread shank
After the last stitch, the needle is on the inside. Bring it through the fabric beside the attachment, stopping underneath the button: do not go through a button hole this time. Slide out the pin and lift the button slightly to take up the slack.
Wind the working thread three times around the bundle between the fabric and the button. This makes a short thread shank. Wrap the bundle, not the rim of the button. The gap makes room for the buttonhole layer; a thin shirt does not need a long, loose stem.
5. Fasten off on the inside
Pass the needle down through the fabric beside the base of the shank. On the inside, slide it under the existing stitches without piercing them. Leave a loop before pulling the thread all the way through. Pass the needle through that loop and tighten the knot. Repeat once more. Only then trim the remaining thread, leaving a short tail.
6. Check the fastening
Put the needle and pin away, then button and unbutton the shirt. Look at the placket without pulling it and gently move the button with your fingers.
- The placket lies flat, the button fits through the hole and the stitches stay fastened: you are finished.
- The button is the right size but the fastening pulls the fabric: check its position and the gap. If either is wrong, cut only the new threads and resew.
- The button hangs on long loops: the shank is too loose. Resew with less slack.
- The fabric tears or the needle hole noticeably widens: stop. Extra wraps cannot repair damaged fabric.
About the method
UF/IFAS describes the two-hole button, spacer, wrapping and inside knot; the American Sewing Guild relates the gap to fabric thickness. The loop-knot finish was checked against Patagonia’s guide, and the wrapping sequence against Virginia Cooperative Extension. This guide combines them into one narrow task with an original diagram and final checks.