How to mend an open seam by hand with backstitch
The thread has broken, but the fabric is intact? Close a simple seam with hand backstitch. A diagram shows where the needle goes in and comes out.
1. Check what has broken
Choose a short, accessible section of a plain seam: the thread has broken, but both fabric edges are intact. This guide is for non-stretch woven fabric, such as an ordinary unlined shirt.
If the fabric is torn, fraying up to the stitching or the garment is too tight, closing the gap will not solve the cause. Knits, leather, linings and waterproof seams need a different method.
2. Prepare the needle and arrange the layers
Gather a hand-sewing needle, sewing thread of a similar thickness to the original, small scissors and pins. You can practise on two scraps first. Use a needle that passes through both layers without forcing it.
Cut about 45 cm of thread. Thread the needle, leave a short tail of about 10 cm and knot only the long end: you will sew with one strand. These lengths are a working guide; avoid a thread so long that it tangles.
Take the garment off and turn it inside out. Remove only loose broken threads, keeping sound stitches intact. Put the fabric’s outward-facing sides together, with the seam allowances facing out. The allowance is the strip between the stitched line and the cut edge.
Match the old seamline on both layers and pin them together. Keep the rest of the garment clear: the needle must pass through only the two layers you intend to join. Remove each pin before you reach it.
3. Follow the original seamline
Begin on the intact stitching about 1.3 cm before the gap and finish about 1.3 cm beyond it. This overlaps the repair with sound stitching. If the old needle holes are undamaged, use them as a guide; keep the original line instead of moving towards the edge to hide damage.
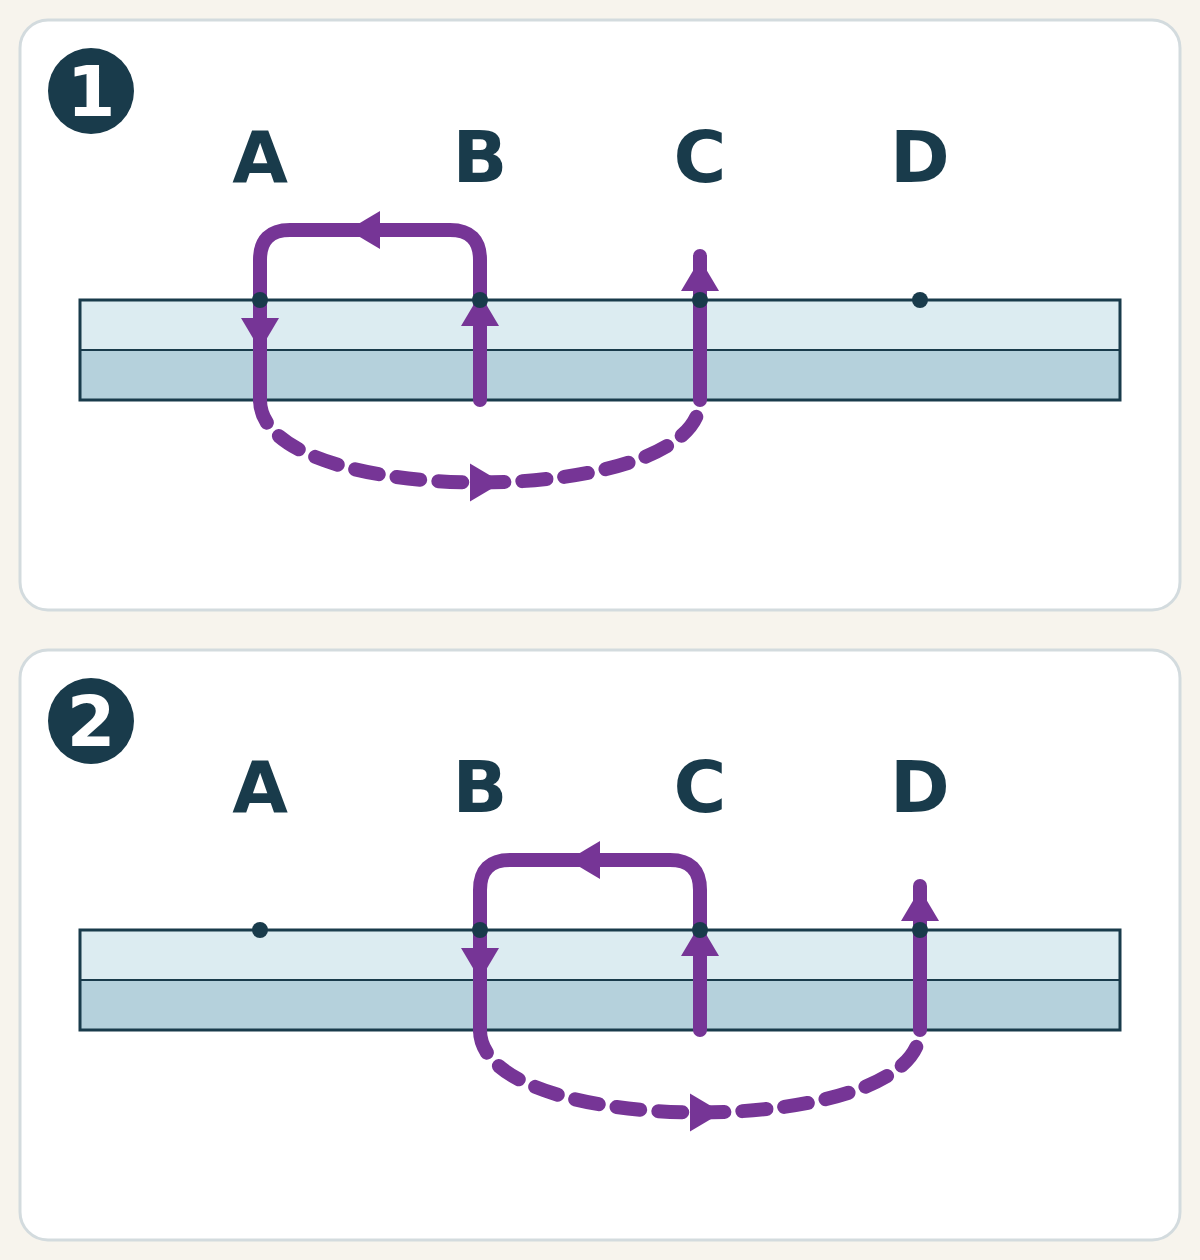
Backstitch advances with a short backward stitch and a longer movement underneath. For practice, use about 2 mm between A, B, C and D in the diagram.
Read the needle path
The diagram enlarges an edge-on view of two fabric layers with their right sides touching. The upper working face is the fabric’s wrong side. “Above” and “below” describe the stack’s faces, not the outside and inside of the garment. Distances are not to scale.
4. Make the backstitch
- Bring the needle up from underneath at B, through both layers. Pull until the knot rests against the fabric.
- Go backwards and insert the needle at A. Bring it out at C: underneath, you have travelled two intervals.
- From C, go back down at B and come up at D. Repeat: enter at the end of the previous stitch and emerge one interval ahead.
- Pull each stitch until the thread rests against the fabric. The seam should stay flat; do not pull it into gathers.
5. Fasten off around the stitches
After sewing beyond the gap, finish a backward stitch so the needle is underneath both layers. Slide it under a nearby sound stitch without piercing the fabric again. Leave a small loop, pass the needle through it and snug the knot without puckering.
Repeat the same knot once more. Cut the thread, leaving a tail of about 6–13 mm. Do not cut flush with the knot.
6. Check the repair
Put the needle and pins away before turning the garment right side out. Look at the outside of the seam and gently ease its two sides apart with your fingers.
- The gap is closed, the layers match and the seam stays flat: the initial check is complete.
- Gaps remain between the layers: check that every stitch passed through both of them.
- The line puckers or the opposite side of the garment is caught: undo only your new stitches and realign.
- The fabric gives way or the seam opens again: check the cloth and garment fit before repeating the repair.
About this guide
The method draws on University of Tennessee Extension’s seam-repair instructions and Wandering Wardrobe’s finishing knot, hosted by University of North Texas. The sequence and diagram are by Coru.