How to hand-sew a small drawstring pouch
Make a small pouch without a sewing machine. Follow the seam plan, keep both casings open and thread the two cords from opposite sides.
A first pouch, sewn entirely by hand
Make an unlined pouch for a few light, dry belongings: a coiled charging cable, hair accessories or a small gift. Cut two rectangles; sew three edges; turn the tops into two fabric tunnels, called casings. Two cords let you gather the mouth from opposite sides.
The proposed flat size is about 20 cm wide × 24 cm high, including the casing. It is not a fitted case or a bag for heavy, sharp or loose tiny contents: the gathered mouth is not a seal. These dimensions and diagrams have been checked digitally; this exact pouch has not been physically sewn or load-tested.
What you need
- Two pieces of light or medium-weight, non-stretch woven cotton, each at least 22 × 28 cm. Avoid thick, slippery or loosely woven cloth for this first attempt.
- Two 60 cm lengths of smooth cord, about 2–3 mm thick; sewing thread; a hand needle that passes through the folded cloth without force.
- Ruler, washable fabric marker, scissors, pins or clips, a small closed safety pin or a bodkin for threading, and an iron with a suitable ironing surface. A thimble is optional.
1. Cut and mark
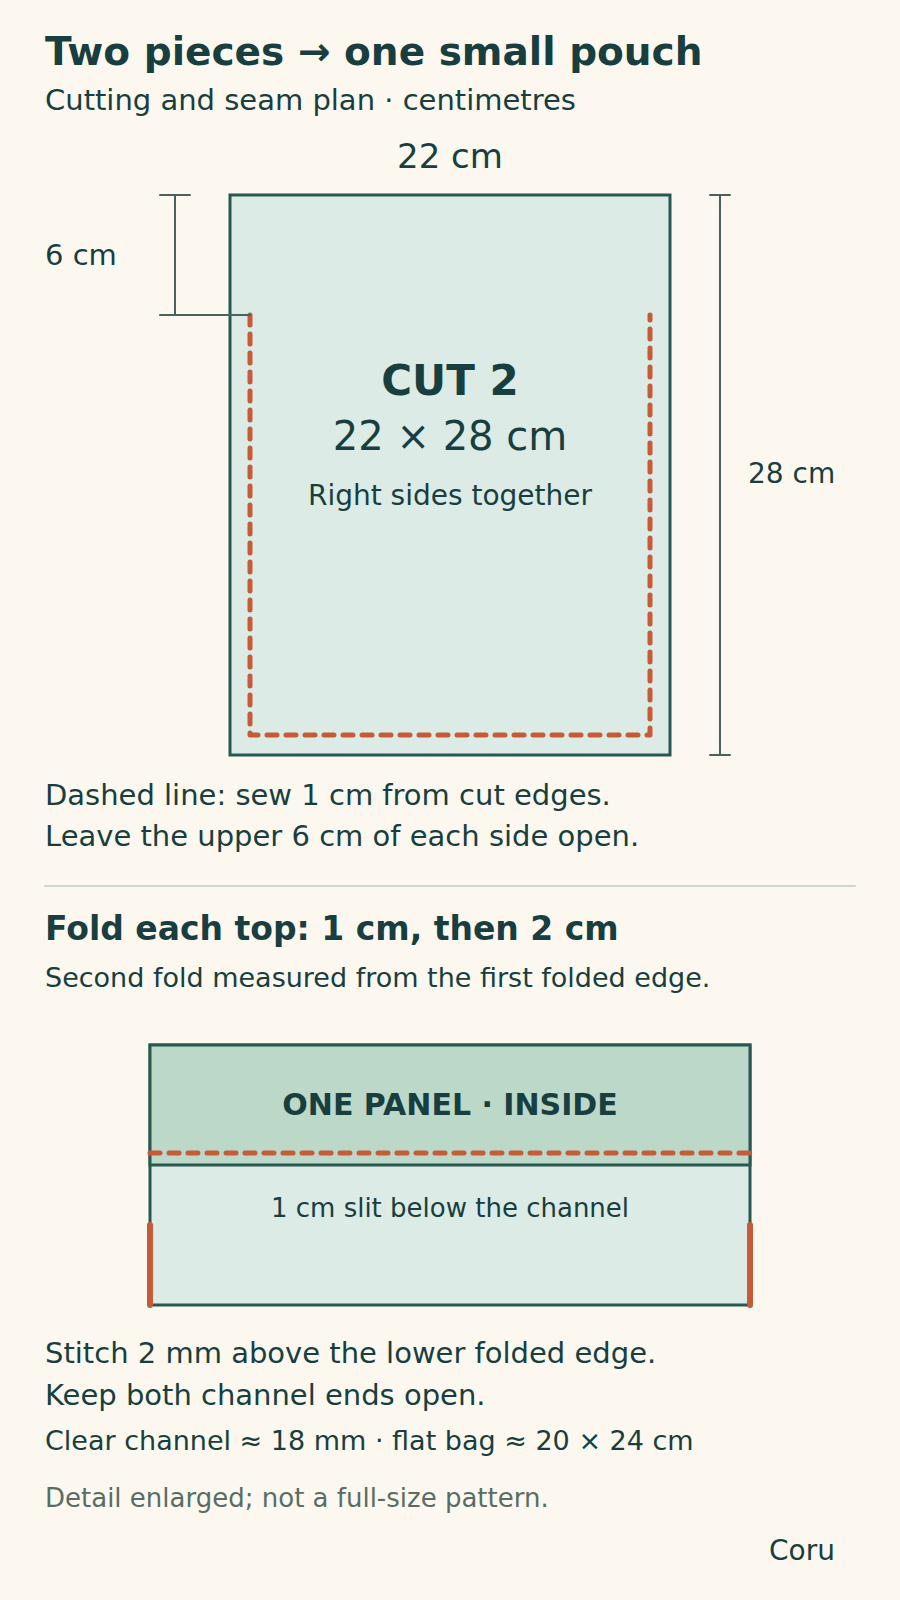
If you expect to wash the finished pouch, wash and dry the fabric first using its care instructions, then press it. Cut two 22 cm wide × 28 cm high rectangles. “Right side” means the face you want outside; “wrong side” will face inside.
On the wrong side, mark a seamline 1 cm from each side and the bottom. Mark a stop 6 cm below the raw top at both sides. These measurements include all allowances: do not add extra fabric. Keep the 28 cm direction vertical.
2. Finish the raw side and bottom edges
Work on each rectangle separately. Overcast the two long sides and the bottom: bring the needle through a few millimetres inside the cut edge, carry the thread around the edge, then repeat a little farther along. Make a row of slanting loops without rolling or gathering the edge. The top raw edge will be enclosed by its folds.
Use short, manageable lengths of single thread; about 45 cm is a starting length. Knot the long end. When a length runs low, slide the needle under an existing stitch, leave a loop, pass through it and tighten gently. Repeat the loop knot once, then trim with a short tail. Start the next length beside the secure stitches.
3. Sew the sides and bottom
Place the right sides together. Align the raw edges and pin or clip. Start at one 6 cm stop and backstitch down its marked seamline, across the bottom, then up the other side to the second stop. Leave the top and the upper 6 cm of both sides unjoined.
To start the backstitch with knotted thread, emerge 2 mm beyond the marked start, go down at the start, then emerge 2 mm beyond your first exit. Continue: go down at the previous exit and emerge 2 mm beyond the newest exit. Each stitch must catch both panels. Finish each line with the loop knots from step 2. Remove pins before reaching them and keep fingers clear of the point.
Press the side seam allowances apart, including the unsewn upper section. Do not cut into the bottom corners; gently ease them out later. Slightly rounded corners are fine for this project.
4. Secure the four opening edges
At the unsewn top of each side, turn each panel’s free 1 cm side allowance to the wrong side and press it. Stitch close to its overcast raw edge, from the raw top down to the seam stop, catching only that allowance and its own panel. Repeat for all four upper edges. This keeps loose seam allowances out of the cord route.
Do not sew the front opening edge to the back opening edge. The overcast finish remains visible on the inside.
5. Fold and sew two separate casings
On one panel, turn the raw top edge 1 cm to the wrong side and press. From that already-folded top edge, measure another 2 cm down; fold on this new line and press. The first fold hides the raw edge inside the second. Repeat on the other panel.
Backstitch across each panel 2 mm above its lower folded edge. Keep the other panel out of the way. Leave both short ends of each channel open; do not stitch across them. The clear channel is about 18 mm deep.
The folds use 3 cm of the original height. Each casing ends 5 cm below the original raw top, leaving a 1 cm slit above the side seam. That slit is intentional. After turning the pouch right side out, check that both channels are open from end to end.
6. Thread cord A, then cord B
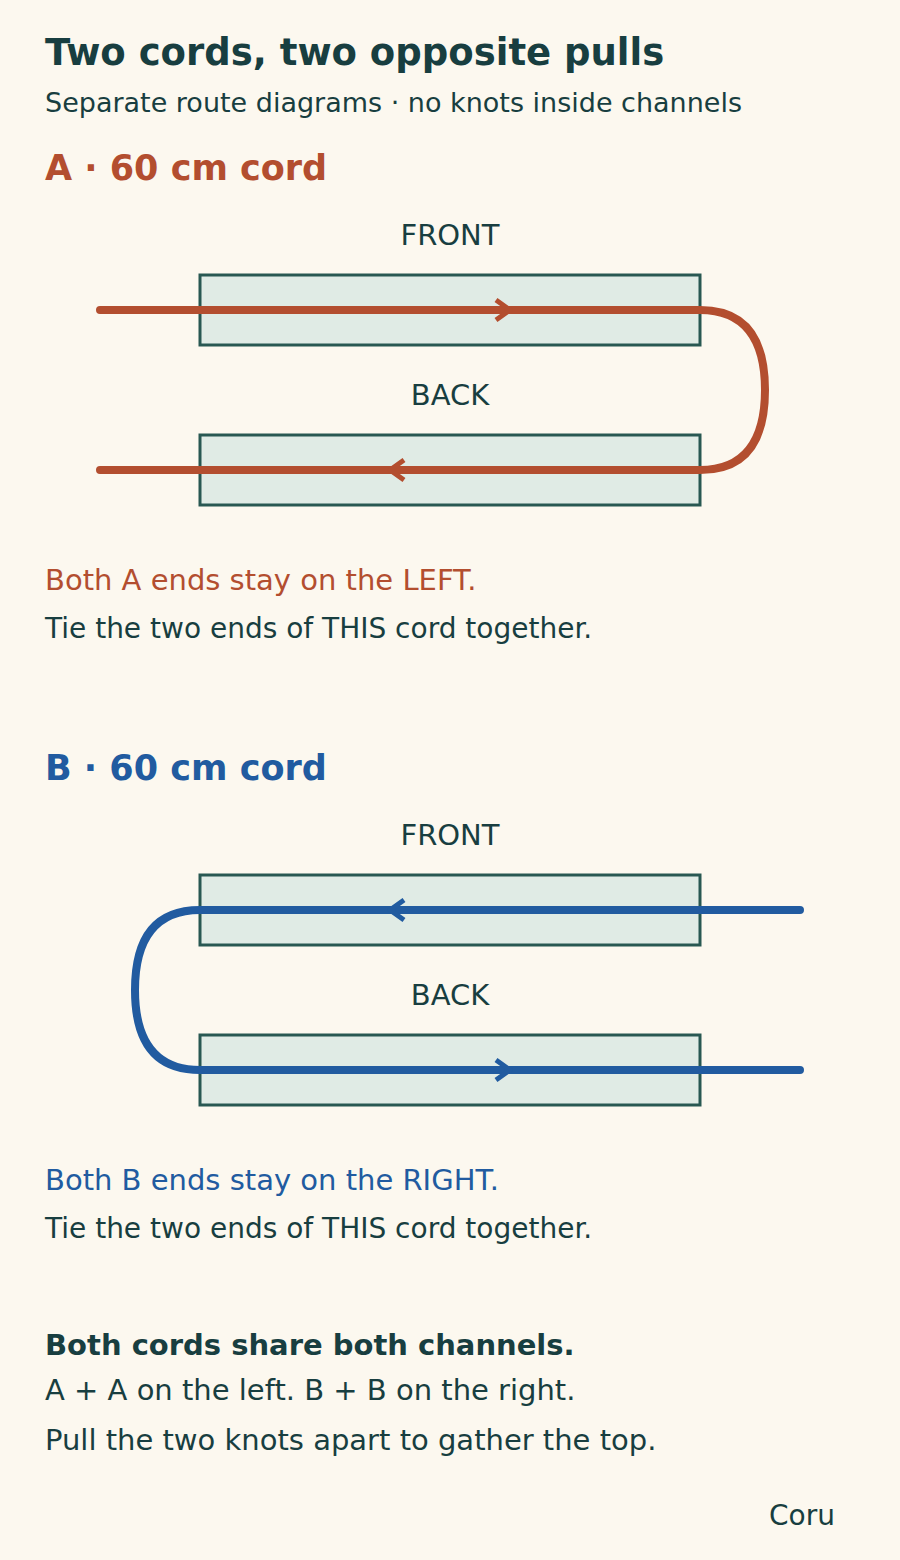
Keep the pouch facing the same way throughout. Attach the closed safety pin to one end of cord A. Feed it through the FRONT channel from left to right, then through the BACK channel from right to left. Bunch cloth onto the pin and ease it along; keep the free tail outside. Remove the pin.
Cord B goes the other way: FRONT right to left, then BACK left to right. Its two ends finish on the right. If the pin catches, ease back and inspect the opening; do not force it through a stitch.
With the mouth fully open, even up the two ends of A on the left and tie them together in one overhand knot, treating the pair as a single strand. Tie B’s two ends together on the right in the same way. Do not tie A to B. Leave the cords at their original length until you have checked the closure.
7. Try the closure before adding contents
Put away the needle, pins and threading tool. Pull the two knots apart gently; the mouth should gather. Ease the top fabric back along the cords to reopen it. Keep the cords away from young children; this is a household storage project, not a toy or a wearable bag.
- Both knots are on the same side: rethread B from the opposite side.
- A cord will not slide: inspect for a stitch through the cord, a caught seam allowance or a bulky knot inside a channel.
- Fabric puckers along a side seam: loosen and redo the tight section before use.
- A seam opens or fraying reaches the seamline: stop using the pouch and repair the construction; do not add more weight.
About this pattern
Coru chose the dimensions, slit clearance, hand-sewing sequence and diagrams for this small practice project. The sources below explain the underlying casing, backstitch, edge-finishing, knot and double-cord methods. No source is evidence of a physical trial of this particular pattern.