How to measure a room for a simple furniture plan
A room can be wide enough for a desk while the door still hits it. Record the room, its openings and the space things need to move before trying a layout on paper.
1. Sketch first; measure second
Use a tape measure, pencil and paper. Draw the room from above, roughly, and name the walls A, B, C and D clockwise. Mark doors, windows, recesses, columns and fixed items such as radiators. An L-shaped room needs its extra corners drawn too.
Start with the inside length of every wall. Write the actual readings in centimetres, including fractions such as 42.5 cm; do not mix metres and centimetres in the same list. Keep the tape straight rather than following furniture around an obstruction. Mark an inaccessible dimension as unknown.
This is a furniture-planning sketch. IKEA’s measuring guidance and Moen’s worksheet both include openings and fixed features, not just the room’s length and width. Their kitchen guidance is useful here for the measurement method; it does not establish a universal furniture clearance.
2. Give every opening a position
A window width alone does not say where the window is. Along its wall, record three lengths in order: corner to the first edge of the opening, opening width, and second edge to the next corner. Do the same for each door.
Use a consistent edge for every measurement in a chain. Do not measure to the opening on one side and to the outside of the trim on the other. Record protruding trim separately if it reduces the space available to furniture.
- Draw the door leaf and the direction it swings. Open the actual door to see the space it uses.
- Record window-sill height and how the window opens if furniture might stand beneath it.
- Add the height and depth of radiators, skirting boards and other obstacles. Mark sockets you need to reach.
- Measure the furniture’s widest and deepest parts, including projecting handles or feet; note space used by drawers, doors and a pulled-out chair.
3. Check the numbers before drawing neatly
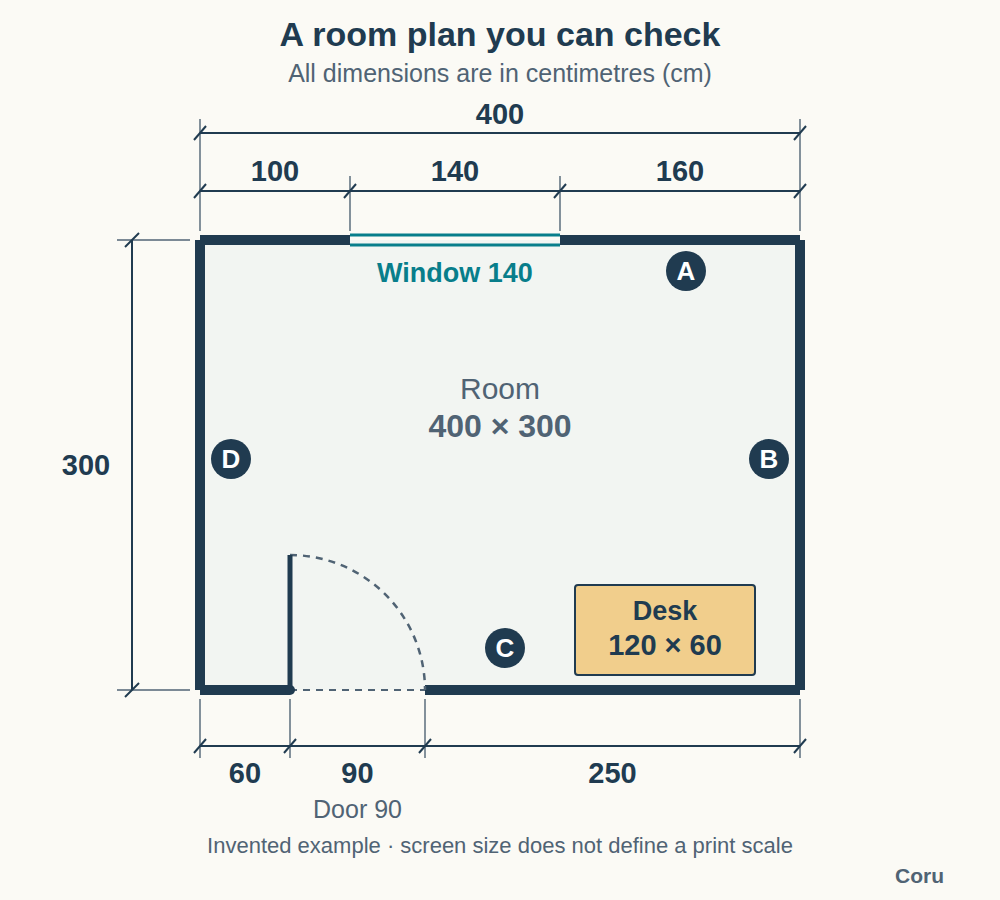
The diagram below is an invented Coru example, not a surveyed room. The inside room dimensions are 400 × 300 cm. Wall A is at the top, B on the right, C at the bottom and D on the left.
On wall A, the measurements from left to right are 100 cm + a 140 cm window opening + 160 cm = 400 cm. On wall C, also read from left to right, they are 60 cm + a 90 cm door opening + 250 cm = 400 cm. The door hinge is at the left edge of its opening; the leaf swings inward. This simplified example makes both the opening and the leaf 90 cm wide and omits the frame. In a real room, measure the leaf and the clear passage separately.
If the first chain instead reads 100 + 140 + 165 = 405 cm while the full wall reads 400 cm, recheck the endpoints, units and measurements. Do not shorten a segment by 5 cm just to make the drawing close. Matching totals are a useful check, not proof that every measurement or corner is correct.
4. Draw the example at 1:25
At 1:25, divide every real length by 25 to get the drawing length in the same unit. The 400 × 300 cm room becomes 16 × 12 cm on paper. The 140 cm window becomes 5.6 cm; the example’s 90 cm door leaf becomes 3.6 cm.
Cut out a paper rectangle for a 120 × 60 cm desk: it should be 4.8 × 2.4 cm. Move it around the plan before moving the real desk. The diagram places its top-left corner 250 cm from the left wall and 230 cm from the top wall: that leaves 30 cm at the right and 10 cm at the bottom. These are example coordinates, not recommended gaps.
Use a ruler for your paper drawing. The on-screen illustration resizes with your device, so measuring the picture itself will not give a reliable 1:25 scale.
5. Check what a flat rectangle leaves out
A desk rectangle represents its footprint. It does not include a person sitting at it, a drawer opening or an access route. Mark those uses separately and try them in the room. Check the door swing against the proposed furniture, and check heights where a window, sill or sloping ceiling matters.
If opposite walls have different lengths, or the room has angled corners, keep those observations on the sketch. Do not force them into this rectangular example. A measured sketch with an unresolved dimension is more useful than a neat plan with invented certainty.
A room plan also does not prove that furniture can be delivered into it. Check the separate route through building entrances, doors, stairs and turns, using the item’s transport dimensions and the supplier’s instructions.
Copy this measurement record
text
ROOM / DATE:
UNIT: cm
WALLS: A ___  B ___  C ___  D ___
OPENING / WALL:
  corner-to-edge ___ + width ___ + edge-to-corner ___
  total ___ / measured full wall ___
DOOR: hinge side ___ / swing direction ___
WINDOW: sill height ___ / opens ___
FIXED OBSTACLES: position ___ / width x depth x height ___
FURNITURE: width ___ / depth ___ / height ___
MOVEMENT: door / drawer / chair space ___
UNKNOWN OR TO RECHECK: ___
PAPER SCALE: 1:___
Repeat the opening row for each door or window. Add segments and named corners for an irregular room.
Your next step
Choose one wall with an opening. Write its full length, then the opening’s position and width. Check that the pieces agree before measuring the rest. The useful result is a labelled set of measurements you can revisit, not a perfectly drawn rectangle.